Tester la méthode ngOnChange d'un composant Angular

Table des matières
Créer un composant à tester
Pour commencer, nous allons créer un nouveau projet avec un composant qui nous servira de base pour le test.
ng new testing-project
cd testing-project
ng generate component StringWithCounter
Ce composant aura un comportement très simple, il prendra en paramètre une chaîne de caractères, il comptera le nombre de lettres de cette chaîne, et il affichera la chaîne de caractères et le nombre de lettres dans le template.
import { Component, Input, OnChanges, SimpleChanges } from '@angular/core';

@Component({
    selector: 'app-string-with-counter',
    template: `<p>{{ theString }} (length: {{ theStringCount }})</p>`,
})
export class StringWithCounterComponent implements OnChanges {

    /**
     * The string to compute.
     */
    @Input() theString?: string;

    /**
     * The computed length of the string.
     */
    public theStringCount = 0;

    /**
     * Check for changes in the string and compute the length of the string.
     */
    ngOnChanges(changes: SimpleChanges): void {
        if (changes.theString) {
            this.theStringCount = changes.theString.currentValue ? changes.theString.currentValue.length : 0;
        }
    }
}
Tester notre composant
Pour tester notre composant, nous allons lui passer une chaîne de caractères de test et vérifier que la taille calculée est bien celle attendue.
Deux possibilités s'offrent à nous, la première et la plus simple, est d'appeller directement la méthode ngOnChange avec une réplique de ce que
le cycle de vie du composant aurait envoyé.
import { Component, SimpleChange } from '@angular/core';
import { ComponentFixture, TestBed } from '@angular/core/testing';
import { By } from '@angular/platform-browser';
import { StringWithCounterComponent } from './string-with-counter.component';

describe('Classical test of the component', () => {

    let component: StringWithCounterComponent;
    let fixture: ComponentFixture<StringWithCounterComponent>;

    beforeEach(async () => {
        await TestBed.configureTestingModule({
            declarations: [StringWithCounterComponent]
        }).compileComponents();
    });

    beforeEach(() => {
        fixture = TestBed.createComponent(StringWithCounterComponent);
        component = fixture.componentInstance;
        fixture.detectChanges();
    });

    it('Will not update the count this way.', () => {

        // WHEN
        component.theString = 'Vincent';

        // THEN
        fixture.detectChanges();
        expect(component.theStringCount).toEqual(0);
    });

    it('Should update the count correctly.', () => {

        // WHEN
        component.ngOnChanges({
            theString: new SimpleChange(undefined, 'Vincent', true),
        });

        // THEN
        fixture.detectChanges();
        expect(component.theStringCount).toEqual(7);
    });
});
La deuxième est de créer un composant de test pour appeler notre composant à tester. Cette approche semble plus saine car elle se rapproche plus de l'utilisation normale que l'on ferait de notre composant.
describe('Test with a wrapper component', () => {

    @Component({
        selector: 'app-test-wrapper-component',
        template: `<app-string-with-counter [theString]="testedInput"></app-string-with-counter>`
    })
    class TestWrapperComponent {
        public testedInput?: string;
    }

    let wrapperComponent: TestWrapperComponent;
    let testedComponent: StringWithCounterComponent;
    let fixture: ComponentFixture<TestWrapperComponent>;

    beforeEach(async () => {
        await TestBed.configureTestingModule({
            declarations: [
                StringWithCounterComponent,
                TestWrapperComponent,
            ]
        }).compileComponents();
    });

    beforeEach(() => {
        fixture = TestBed.createComponent(TestWrapperComponent);
        wrapperComponent = fixture.componentInstance;
        testedComponent = fixture.debugElement.query(By.directive(StringWithCounterComponent)).componentInstance;
        fixture.detectChanges();
    });

    it('Update the count correctly.', () => {

        // WHEN
        wrapperComponent.testedInput = 'Vincent';

        // THEN
        fixture.detectChanges();
        expect(testedComponent.theStringCount).toEqual(7);
    });
});
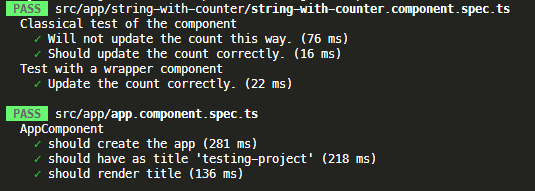
Résultat

Il est bien-sûr possible de créer plusieurs composants de tests différents pour simuler plusieurs cas d'usage différents.